

How to choose the right color for your house
Choosing the Right Color for Your House
Selecting the perfect color for your home can be an exciting yet challenging task. The right color not only enhances the aesthetic appeal of your house but also reflects your personal taste and complements the surrounding environment. Here are some key considerations to help you make the best choice.
1. Consider the Architectural Style

The architectural style of your home plays a significant role in color selection. Traditional homes may benefit from classic colors like whites, creams, or muted earth tones, while modern designs can handle bolder hues. Take a moment to observe similar homes in your neighborhood; this can provide inspiration and ensure that your color choice harmonizes with the surrounding structures.
2. Analyze the Neighborhood

Your neighborhood’s color palette can influence your decision. While it’s essential to express your style, blending in with the existing colors can enhance the overall aesthetics and maintain property values. A bright color might stand out excessively, while a neutral tone may complement the more subdued color schemes of nearby homes.
3. Test Samples

Before committing to any color, it’s wise to test samples first. Purchase small amounts of paint in your selected shades and apply them to different areas of your home’s exterior. Observing how the color interacts with natural light at different times of the day will provide you with a clearer understanding of how it will look once fully applied.
4. Consider the Surrounding Landscape

Your home’s environment can affect your color choice. For homes surrounded by lush greenery, earthy tones may complement the scenery, while coastal homes might shine in brighter shades that reflect the seaside atmosphere. Additionally, consider the color of your roof, trim, and landscaping such as flowerbeds, woodchips or decorative rock; these elements should cohesively tie into your overall color scheme.
5. Pay Attention to Trends

While personal preference should drive your decision, it’s also worth noting current color trends. Popular colors can change over time, and incorporating trendy shades can refresh your home's aesthetic. However, choose colors that you genuinely like and that will endure beyond fleeting fads.
6. Think About Resale Value

If you’re considering selling your home in the near future, choose colors that have broad appeal. Neutral shades often attract a wider range of buyers and can make your home feel more inviting. However, do not feel constrained to avoid color altogether; tasteful, well-coordinated shades can be very appealing in the right context.
Conclusion
Choosing the right color for your house is a blend of personal expression and practical consideration. By exploring architectural harmony, neighborhood influences, and natural elements, you can find a color scheme that reflects your personality while enhancing your home’s beauty. Take your time in the decision-making process and enjoy transforming your space into a visually appealing sanctuary.

Exterior Paint Maintenance: A Guide to Preserving the Beauty of Your Home
Introduction:
The vibrant allure of a freshly painted exterior can transform your home, but to keep that appeal intact, regular maintenance is key. In this blog post, we'll explore the essential steps and tips for effective exterior paint maintenance, ensuring your home remains a beacon of curb appeal.
1. **Routine Cleaning:**
- **Dirt and Debris:** Over time, dust, dirt, and debris can accumulate on your exterior surfaces, dulling the paint's vibrancy.
- **Solution:** Regularly clean your home's exterior using a mild detergent and a soft brush or pressure washer. This helps maintain the paint's luster and prevents the buildup of grime.
2. **Inspect for Damage:**

- **Cracks and Peeling:** Inspect your home for any signs of damage such as cracks, peeling, or blistering.
- **Solution:** Address these issues promptly by scraping away loose or damaged paint and applying touch-ups or a fresh coat to protect against further deterioration.
3. **Trim and Accent Touch-Ups:**
- **Fading and Wear:** High-traffic areas, trim, and accent features may experience faster wear and fading.
- **Solution:** Regularly touch up these areas to maintain a cohesive appearance. Small touch-ups can prevent larger, more expensive repaints in the long run.
4. **Check Caulking and Seals:**
- **Weather Stripping and Caulking:** Inspect caulking around windows, doors, and other openings.
- **Solution:** Replace any damaged or worn caulking and ensure weather stripping is intact. Proper seals protect your home from moisture and maintain the integrity of the paint.
5. **Address Mold and Mildew:**

- **Damp Environments:** Mold and mildew can thrive in damp conditions, affecting both the appearance and longevity of your paint.
- **Solution:** Clean and treat affected areas with a mildew-resistant cleaner. Address any underlying moisture issues to prevent future growth.
6. **Regular Inspections:**
- **Thorough Assessments:** Conduct comprehensive inspections of your home's exterior at least once a year.
- **Solution:** Look for signs of wear, damage, or discoloration. Early detection allows for timely repairs and prevents more extensive problems.
7. **Protect Against Harsh Elements:**

- **Sun and Weather Exposure:** Exposure to UV rays, rain, and harsh weather conditions can accelerate paint deterioration.
- **Solution:** Consider using paints with UV protection and weather-resistant properties. Regular maintenance, such as cleaning and protective coatings, helps combat the impact of the elements.
8. **Mindful Landscaping:**
- **Foliage and Plantings:** Overgrown vegetation can rub against painted surfaces, causing damage.
- **Solution:** Trim back foliage and plants to maintain a safe distance from exterior walls. This prevents unnecessary wear and tear on the paint.
9. **Professional Inspections:**
- **Expert Input:** Periodically seek the expertise of a professional painter or contractor for a thorough inspection.
- **Solution:** Professionals can identify issues you might overlook and provide insights into the overall condition of your home's exterior, guiding you on necessary maintenance steps.
10. **Schedule Repainting When Needed:**
- **Assessing Lifespan:** Exterior paint has a lifespan, and regular maintenance can only extend it so far.
- **Solution:** When your paint is reaching the end of its lifespan, consider scheduling a fresh coat. This proactive approach protects your home and ensures consistent curb appeal.
Conclusion:
Exterior paint maintenance is a proactive investment in the longevity and aesthetic appeal of your home. By incorporating routine cleaning, inspections, and timely repairs, you not only preserve the vibrancy of your exterior but also safeguard against more extensive damage. Take pride in your home's appearance by adopting a comprehensive approach to paint maintenance – a strategy that pays off in sustained beauty and protection.

Brushing Value In: How Exterior Painting Boosts Your Home's Worth
Introduction:
Investing in your home's exterior goes beyond mere aesthetics; it's a strategic move to enhance its overall value. In this blog post, we'll explore how painting your home's exterior can significantly contribute to its market value and appeal to potential buyers.
Curb Appeal's Impact:
1. **First Impressions Matter:** The exterior of your home is the first thing prospective buyers see. A freshly painted exterior creates an inviting and well-maintained appearance, instantly capturing attention.

2. **Increased Perceived Value:** A well-painted exterior suggests a home that has been cared for, raising the perceived value of the property in the eyes of potential buyers.
Protection Against the Elements:
1. **Preserving Structural Integrity:** Exterior paint serves as a protective layer, safeguarding your home against harsh weather conditions, UV rays, and moisture. This protection can prevent costly structural damage over time.
2. **Longevity of Materials:** Regular painting contributes to the longevity of exterior materials, such as wood, siding, and trim, reducing the need for repairs or replacements.
Enhanced Marketability:
1. **Wider Buyer Appeal:** Neutral and well-maintained exteriors have broad market appeal, appealing to a wider range of potential buyers.
2. **Faster Sale:** Homes with enhanced curb appeal tend to spend less time on the market. A fresh coat of paint can be a decisive factor for buyers looking for move-in-ready properties.
Return on Investment (ROI):
1. **Cost-Effective Upgrade:** Exterior painting is a cost-effective way to enhance your home's appearance and value compared to more extensive renovations.

2. **High ROI:** The return on investment for exterior painting is often high, making it a smart choice for homeowners looking to increase their property's value without breaking the bank.
Color Psychology in Real Estate:
1. **Neutral Appeal:** Neutral tones create a timeless and versatile look that appeals to a broader audience. This increases the chances of your home making a positive impression on potential buyers.
2. **Strategic Use of Color:** Thoughtful use of accent colors can highlight architectural features and add personality to your home without compromising its marketability.
DIY vs. Professional Painting:
1. **Quality Matters:** While DIY painting can be cost-effective, hiring professionals ensures a high-quality, long-lasting finish that adds significant value to your home.
2. **Proper Preparation:** Professionals understand the importance of thorough preparation, addressing repairs, and using quality materials for a flawless result.

Conclusion:
Painting your home's exterior is not just a cosmetic improvement; it's a strategic investment that enhances curb appeal, protects your property, and ultimately increases its market value. Whether you're preparing to sell or simply looking to elevate your home, the transformative power of exterior painting is a key to unlocking your property's full potential. Brush on the value and watch your home shine in the real estate market.

Elevate and Transform: A Guide to Painting Rental Properties with Style and Practicality
When it comes to rental properties, a fresh coat of paint can work wonders in enhancing aesthetics, attracting tenants, and maintaining the overall value of the property. However, painting a rental property comes with its own set of considerations and challenges. In this guide, we'll explore key tips and strategies for painting rental properties that strike the right balance between style and practicality.
**1. Obtain Permission:**
- Before picking up a paintbrush, check your lease agreement and seek permission from the property owner or management. Some landlords may have specific guidelines or restrictions regarding paint colors or techniques.
**2. Opt for Neutral Colors:**

- Choose neutral colors for walls and trim. Neutral tones provide a clean and versatile backdrop that appeals to a wide range of tenants. They also make it easier for future occupants to visualize their furnishings in the space.
**3. Durable and Washable Paint:**
- Prioritize durable and washable paint finishes, especially in high-traffic areas. This ensures that the walls can withstand the wear and tear associated with multiple tenants and make cleaning between leases more manageable.
**4. Patch and Repair First:**
- Before painting, inspect the walls for any imperfections, holes, or damage. Patch and repair these areas to create a smooth and flawless surface. Addressing issues before painting contributes to a professional-looking result.
**5. Consider Removable Wallpaper or Decals:**
- For an alternative approach, consider using removable wallpaper or decals. These options provide an opportunity to add stylish accents without the permanence of traditional paint. It also allows tenants to personalize the space easily.
**6. Stick to a Budget:**
- Keep the budget in mind when selecting paint and supplies. While quality is important, there are affordable paint options that offer durability and good coverage. Be mindful of costs to maximize the return on investment.
**7. Test Paint Colors:**

- Before committing to a full paint job, test colors in a small area to ensure they complement the existing features and lighting conditions. Testing prevents potential color regrets and ensures a cohesive look throughout the property.
**8. Use Low-VOC Paint:**
- Opt for low-VOC (volatile organic compounds) or zero-VOC paint to minimize strong odors and improve indoor air quality. This is particularly important in rental properties where tenants may have sensitivities or allergies.
**9. Coordinate with Fixtures and Features:**
- Consider existing fixtures, flooring, and features in the property when selecting paint colors. Coordinating with these elements creates a cohesive and harmonious overall look.

**10. Focus on High-Impact Areas:**
- Prioritize painting high-impact areas such as the entryway, living room, and kitchen. These spaces leave a lasting impression on potential tenants and contribute significantly to the property's appeal.
**11. Maintain Consistency:**
- Maintain a consistent color palette throughout the property. Consistency fosters a sense of unity and flow, creating a more polished and well-thought-out appearance.
**12. Document Changes:**
- Keep a record of paint colors used and any other changes made to the property. This documentation can be valuable for future touch-ups or renovations, ensuring continuity and ease of maintenance.
**13. Consider Professional Help:**
- If you're not confident in your painting skills or if the property is extensive, consider hiring professional painters. Professional services can save time, deliver high-quality results, and ensure a polished finish.
By approaching the painting of rental properties with a combination of style and practicality, you can elevate the appeal of the space, attract quality tenants, and maintain the property's value over time. Whether you're a property owner or a tenant looking to make positive changes, these tips will guide you toward creating a stylish and tenant-friendly environment. Happy painting!

Shades of Illumination: The Impact of Lighting on Paint Colors
Choosing the perfect paint color is a creative and exciting part of transforming your living space. However, the impact of lighting on paint colors cannot be overstated. The interplay between natural and artificial light can significantly influence how colors appear on your walls. In this guide, we'll explore the fascinating relationship between lighting and paint colors, offering insights to help you achieve the desired ambiance in your home.
**1. Consider Natural Light:**

Natural light is a dynamic and ever-changing source that can dramatically affect how paint colors are perceived. Take note of the direction and intensity of sunlight in different rooms throughout the day. Colors may appear warmer in direct sunlight and cooler in shaded areas.
**2. Assess Artificial Lighting Types:**
Different types of artificial lighting, such as incandescent, fluorescent, LED, or halogen, emit distinct color temperatures. Warm-toned lights, like incandescent bulbs, enhance warm colors, while cooler-toned lights, like LED bulbs, can make cool colors appear crisper. Consider the type of lighting used in each room when selecting paint colors.
**3. Pay Attention to Color Temperature:**

Color temperature is measured in Kelvins (K) and influences the warmth or coolness of light. Warm tones range from 2700K to 3000K, while cool tones start around 3500K and go up. Match the color temperature of your lighting with the desired warmth or coolness of your paint colors for a harmonious look.
**4. Experiment with Sample Paints:**
Before committing to a full paint job, test sample colors on your walls. Evaluate how they look under different lighting conditions, both natural and artificial. This hands-on approach allows you to see firsthand how the chosen colors respond to the specific lighting in your home.
**5. Account for Room Orientation:**
The orientation of a room—whether it faces north, south, east, or west—can impact the amount and quality of natural light it receives. Rooms facing north may have cooler light, while those facing south may receive warmer sunlight. Adjust your color choices accordingly to achieve the desired atmosphere.
**6. Test in Different Areas of the Room:**
Paint colors may vary within the same room due to factors like architectural features, furniture placement, and windows. Test your chosen colors in different areas of the room to account for these variations. This ensures a consistent and balanced look throughout the space.
**7. Be Mindful of Undertones:**
Many paint colors have subtle undertones that become more apparent in specific lighting conditions. For example, a gray paint with blue undertones may appear bluer under cool-toned lighting. Consider the undertones of your chosen colors to avoid unexpected shifts in hue.
**8. Use Color Samples in Large Swatches:**

When testing paint samples, apply them in large swatches rather than small patches. This provides a more accurate representation of how the color will look on a larger scale and helps you visualize the overall impact on the room.
**9. Balance Contrast and Light Reflectance:**
Consider the contrast between your wall colors and other elements in the room. Dark colors absorb light and may make a room feel smaller, while light colors reflect light and create a sense of openness. Strike a balance that suits your preferences and the room's characteristics.
**10. Evaluate Overhead Lighting:**
Ceiling lights and fixtures can cast shadows and influence the perception of paint colors. Consider the placement and intensity of overhead lighting when choosing colors. Well-distributed and adjustable lighting can enhance the overall impact of your chosen paint colors.
By understanding the impact of lighting on paint colors, you empower yourself to make informed decisions that align with your vision for each living space. Whether you're aiming for cozy warmth or refreshing coolness, the right balance of lighting and paint colors can bring your home to life. So, illuminate your space thoughtfully, choose colors wisely, and let the transformative power of light enhance the beauty of your living environment. Happy painting!

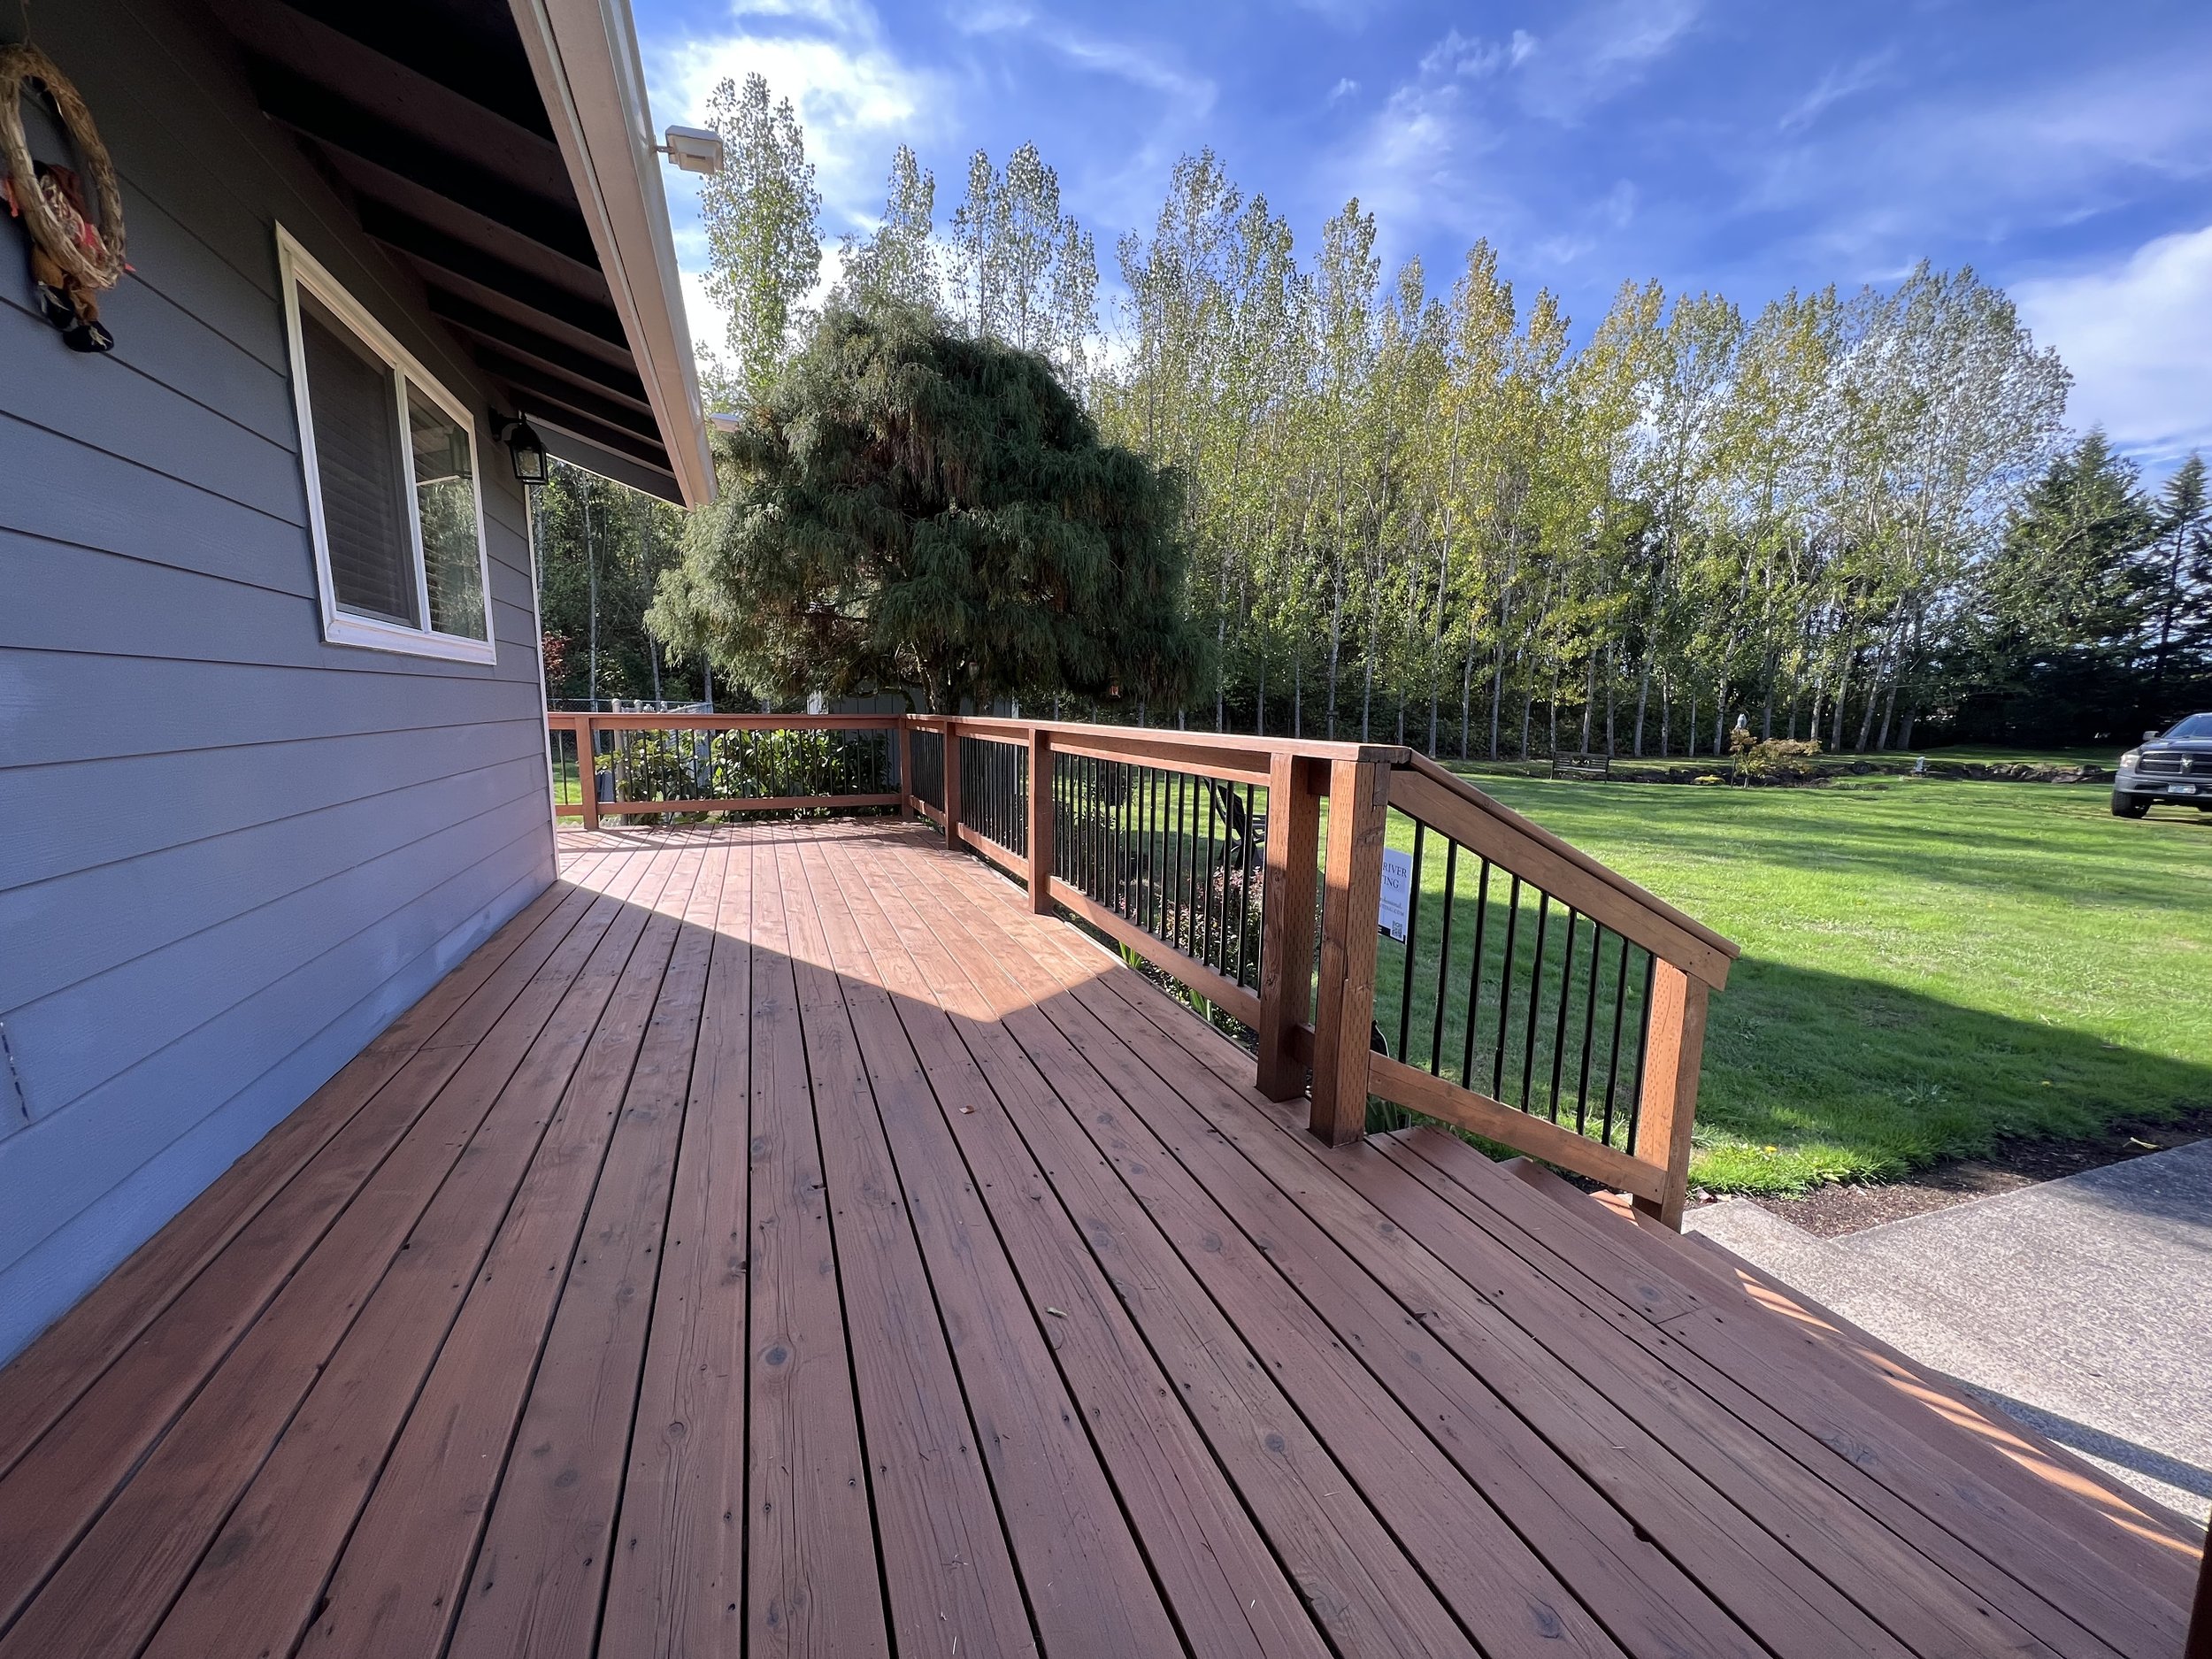
Stain Selection 101: Choosing the Perfect Color for Your Deck
Your deck, an extension of your home's living space, provides a canvas for personal expression and outdoor enjoyment. One of the key decisions in deck maintenance and beautification is choosing the right color stain. In this blog post, we'll guide you through the considerations and tips to help you select the perfect color stain for your deck, creating an inviting outdoor retreat.
1. **Consider Your Home's Exterior:**

Start by looking at the color palette of your home's exterior. Choose a deck stain color that complements or contrasts with your house color for a harmonious overall look. This creates a seamless transition between your indoor and outdoor spaces.
2. **Reflect on Your Style:**
Your deck is an extension of your personal style. Consider whether you prefer a classic, modern, rustic, or eclectic aesthetic. The stain color you choose can play a significant role in defining the ambiance of your outdoor space.
3. **Think About Maintenance:**
Darker stain colors tend to show less wear and tear over time compared to lighter shades. If your deck is likely to experience heavy foot traffic or exposure to the elements, a mid-tone to dark stain may be a practical choice for easier maintenance.
4. **Assess Your Surroundings:**
Take cues from the natural surroundings of your deck. If your outdoor space is surrounded by lush greenery, consider earthy tones that harmonize with nature. For coastal settings, light and airy stain colors can enhance the beachy atmosphere.
5. **Test Samples in Different Lighting:**
Stain colors can appear different depending on the lighting conditions. Test samples in various lighting situations – natural daylight, dusk, and evening. This ensures that the color you choose looks appealing and consistent throughout the day.
6. **Understand Wood Variations:**

Different wood species absorb stain colors differently. Consider the type of wood used for your deck – whether it's cedar, redwood, pine, or another variety – and understand how the stain color interacts with the natural tones and grain patterns of that wood.
7. **Explore Transparency Levels:**

Stains come in various transparency levels – clear, semi-transparent, semi-solid, and solid. The transparency affects how much of the natural wood grain is visible. Choose a transparency level that aligns with your preference for showcasing or concealing the wood texture.
8. **Coordinate with Outdoor Furniture:**
If you have outdoor furniture or decor, factor in these elements when choosing a stain color. Coordinate the deck stain with the colors of your furniture and accessories to create a cohesive and well-coordinated outdoor space.
9. **Check Local Regulations:**
Some neighborhoods or homeowners' associations may have regulations regarding exterior colors. Check with local authorities to ensure that your chosen deck stain color complies with any applicable guidelines.
10. **Personalize with Accents:**
For added visual interest, consider using a different stain color for accents such as railings, posts, or stairs. This can create a striking contrast and highlight specific architectural features of your deck.
By considering these factors and taking the time to explore different options, you can confidently choose a deck stain color that not only enhances the beauty of your outdoor space but also reflects your unique style and preferences. Embrace the process of selecting the perfect stain, and get ready to enjoy countless moments on your beautifully colored deck!

Preserving Elegance: A Guide to Historic Home Restoration through Exterior Painting
Restoring a historic home is a labor of love that involves preserving its unique character and architectural charm. One of the most impactful ways to breathe new life into a historic residence is through carefully planned exterior painting. In this blog post, we'll explore the steps and considerations involved in the artful process of historic home restoration through exterior painting.
1. **Research the Original Colors:**

Begin your historic restoration journey by researching the original colors of your home. Consult historical records, photographs, or local archives to uncover the authentic color palette. This research serves as a foundation for an accurate restoration.
2. **Comply with Preservation Guidelines:**
Check with local preservation boards or historical societies for guidelines on restoring historic homes. Many areas have specific regulations governing exterior colors to ensure authenticity and the preservation of the neighborhood's historical integrity.
3. **Repair and Restore:**
Before applying paint, thoroughly inspect the exterior for any structural issues, damaged wood, or areas in need of repair. Address these issues to ensure a solid foundation for the painting process and to maintain the home's structural integrity.
4. **Select High-Quality Historic Paint:**
Choose high-quality exterior paint formulated for historic restorations. Look for paints that offer durability, weather resistance, and adherence to preservation standards. Historical color charts from reputable paint manufacturers can be valuable resources.
5. **Consult with Preservation Professionals:**

If uncertain about color choices or restoration techniques, consider consulting with preservation professionals. Historians, architects, or experienced painters specializing in historic homes can provide valuable insights and guidance.
6. **Use Traditional Application Techniques:**
Embrace traditional painting techniques that align with the era of your historic home. This may include using brushes and rollers instead of sprayers to achieve a finish reminiscent of the past.
7. **Emphasize Architectural Details:**

Highlight the unique architectural details of your historic home with careful color choices. Use different shades for trim, moldings, and other distinctive features to bring attention to the craftsmanship that makes your home special.
8. **Period-Appropriate Finishes:**
Consider period-appropriate finishes for your exterior. Matte or eggshell finishes can be suitable for certain eras, while others may benefit from a more gloss or semi-gloss appearance. Consult historical references for accurate representation.
9. **Protect Original Materials:**
Take precautions to protect original materials during the painting process. Cover delicate features, such as stained glass or decorative woodwork, to prevent accidental damage from paint drips or spills.
10. **Regular Maintenance for Longevity:**
A beautifully restored historic home requires ongoing care. Implement a regular maintenance schedule, including inspections and touch-ups, to preserve the integrity of the exterior paintwork and protect it from the effects of weathering.
In conclusion, restoring a historic home through exterior painting is a meticulous and rewarding endeavor. By honoring the original colors, following preservation guidelines, and emphasizing architectural details, you can contribute to the preservation of your home's historical legacy. With each brushstroke, you bring the past to life, ensuring that your historic residence remains a timeless symbol of elegance for generations to come.

Beyond Beige: The Power of Exterior Color Consultation for Your Home
Choosing the right exterior color for your home is a decision that goes beyond personal preference – it significantly impacts curb appeal, resale value, and overall aesthetics. If the thought of selecting the perfect hue leaves you overwhelmed, consider the transformative benefits of seeking professional exterior color consultation. In this blog post, we'll delve into the reasons why investing in a color consultation can be a game-changer for your home's appearance.
1. **Expert Guidance:**

Exterior color consultants are trained professionals with a keen eye for color theory and design. They understand the nuances of how different colors interact with architecture, landscaping, and natural light. Their expertise ensures that your home's exterior color palette is harmonious and visually appealing.
2. **Consideration of Architecture:**
Your home's architectural style plays a crucial role in determining the most suitable color scheme. A color consultant takes into account architectural details, such as trim, siding, and accents, to recommend colors that enhance the unique features of your home.
3. **Integration with Surroundings:**

A well-chosen exterior color should complement the surrounding environment, including neighboring homes, landscaping, and the natural elements. Consultants consider these factors to create a cohesive look that seamlessly blends with the surroundings.
4. **Testing Samples in Different Lighting:**
One of the challenges in choosing exterior colors is how they appear in different lighting conditions. Consultants provide color samples and test them under various lighting situations to ensure the chosen palette looks appealing during different times of the day.
5. **Personalized Recommendations:**
Exterior color consultants take the time to understand your personal style and preferences. They tailor their recommendations to align with your vision while offering expert advice on color combinations that suit your taste and the overall aesthetic of your home.
6. **Increased Home Value:**

The right exterior color can significantly impact the perceived value of your home. A well-coordinated color scheme can enhance curb appeal, making your home more attractive to potential buyers. A color consultant helps you make choices that can potentially increase your home's market value.
7. **Avoid Costly Mistakes:**
Painting the exterior of your home is a significant investment. Choosing the wrong color can lead to costly mistakes and the need for repainting sooner than expected. With a color consultation, you minimize the risk of making choices you might regret.
8. **Guidance on Finish and Details:**
It's not just about the color; the finish and details matter too. Consultants provide guidance on the appropriate finish for different surfaces and offer recommendations on how to incorporate details like trim and accents for a polished look.
9. **Streamlined Decision-Making:**
The myriad of color options available can be overwhelming. A color consultant streamlines the decision-making process by presenting you with curated choices based on your preferences, making the selection process more manageable and enjoyable.
10. **Long-Term Satisfaction:**
Investing in a color consultation ensures that the exterior of your home reflects your style and stands the test of time. It's a decision that leads to long-term satisfaction, making you proud of the visual impact your home makes in your neighborhood.
In conclusion, the benefits of getting an exterior color consultation extend far beyond aesthetics. It's an investment that considers the unique characteristics of your home, your personal style, and the surrounding environment, resulting in a color palette that enhances your home's beauty and value. Embrace the power of color consultation and watch your home transform into a stunning masterpiece.

Renewal Under the Sun: A Guide to Refinishing and Staining Your Deck
Your deck, often the go-to spot for outdoor gatherings and relaxation, deserves a rejuvenation. In this blog post, we'll walk you through the steps to refinish and stain your deck, bringing it back to life and ready for countless sunny days ahead.
1. **Inspect and Clean the Deck:**

Begin by thoroughly inspecting your deck for any signs of damage, such as loose boards or protruding nails. Sweep away debris, and use a power washer or deck cleaner to remove dirt, mildew, and old finishes.
2. **Make Necessary Repairs:**
Address any structural issues or loose components. Replace damaged boards, tighten screws, and ensure the deck's foundation is stable. This step is crucial for the long-term durability of your deck.
3. **Sand the Surface:**
Smooth out the wood surface by sanding it. This not only helps in removing any remaining old finish but also prepares the wood to absorb the new stain more effectively. Use a medium-grit sandpaper for this step.
4. **Choose the Right Stain:**

Select a high-quality deck stain that suits your desired look and provides the necessary protection. Transparent stains showcase the natural grain, while solid stains offer a more uniform color. Consider the level of UV protection and weather resistance.
5. **Test the Stain:**
Before committing to the entire deck, test the chosen stain on a small, inconspicuous area. This allows you to confirm the color and ensure it complements the wood's natural tones.
6. **Apply the Stain:**

Use a brush, roller, or sprayer to evenly apply the stain to the deck surface. Work in small sections and follow the wood grain for a polished look. Be mindful of any overlapping to avoid uneven application.
7. **Allow for Drying Time:**
Let the stain dry completely between coats. Check the product instructions for the recommended drying time. Applying multiple thin coats ensures a more durable and consistent finish.
8. **Consider a Sealant:**
Enhance the longevity of your deck by applying a clear sealant over the stained surface. This acts as an additional protective layer against moisture, UV rays, and foot traffic.
9. **Add Finishing Touches:**
Take the opportunity to refresh or upgrade any deck accessories such as furniture, planters, or lighting. Coordinating these elements can enhance the overall aesthetic of your outdoor space.
10. **Regular Maintenance:**
Keep your deck looking its best by implementing regular maintenance practices. Sweep away debris, clean spills promptly, and consider reapplying a maintenance coat of stain every few years.
By following these steps, you can transform your weathered deck into a stunning outdoor retreat. Embrace the warmth of the sun on your renewed deck, and enjoy the beauty of a space that seamlessly blends with nature. Here's to many more outdoor moments on your revitalized deck!

Transformative Fences: Tips for Achieving a Beautiful Stain Finish
Introduction:
Staining your fence isn't just about protection; it's an opportunity to enhance the natural beauty of the wood and add character to your outdoor space. In this blog post, we'll explore valuable tips to help you achieve a stunning and long-lasting stain finish for your fence.
1. **Choose the Right Stain:**

- **Consider Type and Color:** Select a stain that suits your wood type and desired color. Transparent stains showcase the wood's natural grain, while semi-transparent or solid stains add color with varying levels of opacity.
- **UV Protection:** Opt for a stain with UV protection to shield your fence from the sun's harmful rays and prevent premature fading.
2. **Prepare Your Fence:**

- **Clean Thoroughly:** Before staining, ensure your fence is clean and free of dirt, debris, and mildew. Use a pressure washer or a mixture of mild detergent and water to clean the surface.
- **Repair Damages:** Address any cracks, holes, or damaged areas. Proper preparation sets the stage for a smooth and even stain application.
3. **Test the Stain:**
- **Sample Application:** Test the stain on a small, inconspicuous area of your fence to ensure it achieves the desired color and appearance.
- **Observe Dry Time:** Allow the sample to dry completely, as the final color may differ from the wet appearance. This step helps you make any necessary adjustments before committing to the entire project.
4. **Weather Considerations:**
- **Ideal Conditions:** Choose a day with moderate temperatures and low humidity for staining. Avoid staining in direct sunlight, as this can lead to uneven drying and potential lap marks.
- **Check the Forecast:** Ensure no rain is expected for at least 24 to 48 hours after staining to allow for proper drying.

5. **Protect Surrounding Areas:**
- **Cover Plants and Grass:** Use drop cloths or plastic sheeting to protect nearby plants and grass from accidental overspray or drips.
- **Mask Hardware:** Remove or mask hardware such as handles or latches to avoid staining them.
6. **Appropriate Application Tools:**

- **Brush, Roller, or Sprayer:** Choose the application method that suits your fence type and personal preference. Brushes are ideal for intricate details, while rollers and sprayers provide faster coverage for larger surfaces.
- **Quality Tools:** Invest in high-quality brushes, rollers, or sprayers for a smoother and more even application.
7. **Consistent Application:**
- **Follow Wood Grain:** Apply the stain following the wood grain to enhance the natural appearance and ensure even coverage.
- **Avoid Overlapping:** Work in sections and maintain a wet edge to prevent lap marks. Avoid stopping in the middle of a section to maintain consistency.
8. **Multiple Coats for Depth:**
- **Consider Layering:** For a deeper color or increased protection, apply multiple coats of stain. Allow each coat to dry completely before applying the next.
- **Mind Drying Time:** Follow the manufacturer's recommendations for drying time between coats to achieve the best results.
9. **Finishing Touches:**
- **Protect End Grain:** Pay extra attention to the end grain of the wood, as it tends to absorb more stain. Apply additional coats to these areas for uniform color.
- **Add Sealant for Durability:** Consider applying a clear wood sealer or waterproofing product over the stain to enhance durability and prolong the life of your fence.
10. **Regular Maintenance:**
- **Inspect Periodically:** Regularly inspect your stained fence for signs of wear, mildew, or damage.
- **Touch Up as Needed:** Address any issues promptly with spot touch-ups or a new coat of stain to maintain the fence's appearance and protection.
Conclusion:
Staining your fence is a rewarding endeavor that enhances both its aesthetic appeal and durability. By following these tips, you'll embark on a staining journey that transforms your outdoor space, providing long-lasting protection and showcasing the natural beauty of your wood. Enjoy the process and the lasting impact of a beautifully stained fence.

Laying the Groundwork: The Crucial Importance of Prep Work in Exterior Painting
Introduction:
Embarking on an exterior painting project is an exciting endeavor, but the key to a successful and enduring result lies in the often-overlooked phase – preparation. In this blog post, we'll delve into why prep work is the unsung hero of exterior painting, setting the stage for a flawless and long-lasting finish.
1. **Surface Inspection and Repair:**

- **Foundation for Success:** Thoroughly inspect your home's exterior surfaces for any signs of damage, such as cracks, holes, or rot. Repairing these issues before painting is essential to ensure a solid foundation for the paint to adhere.
2. **Cleaning Surfaces:**
- **Dirt and Grime Removal:** Exterior surfaces accumulate dirt, grime, and pollutants over time. Cleaning them thoroughly is crucial to create a clean canvas for the paint.
- **Mold and Mildew Prevention:** Cleaning helps prevent the growth of mold and mildew, which can compromise the integrity of the paint over time.

3. **Sanding and Smoothing:**
- **Preventing Uneven Finish:** Sanding smooths out imperfections and rough spots on the surfaces. This step ensures an even and uniform finish, preventing blemishes in the final paint job.
- **Promoting Adhesion:** Sanding also promotes better adhesion, allowing the paint to bond securely with the surface.
4. **Priming for Adhesion:**

- **Improving Bonding:** Primer acts as a bonding agent between the surface and the paint, enhancing adhesion and preventing peeling or chipping.
- **Stain and Tannin Blocking:** On bare wood, primer helps block stains and tannins from bleeding through the paint, ensuring a clean and consistent color.
5. **Protection for Non-Paint Areas:**
- **Masking and Covering:** Before painting, protect areas that should not be painted, such as windows, doors, and fixtures, using painter's tape and drop cloths.
- **Minimizing Cleanup:** Proper masking reduces the risk of accidental paint splatters on non-paint surfaces, minimizing cleanup efforts.
6. **Choosing the Right Paint:**
- **Understanding Surface Compatibility:** Different surfaces require different types of paint. Proper prep work includes choosing a paint that is compatible with the specific material of your home's exterior.
- **Ensuring Durability:** Matching the paint to the surface ensures the longevity and durability of the finish.
7. **Addressing Existing Paint Issues:**

- **Peeling and Cracking:** If there is existing peeling or cracking paint, addressing these issues is vital. Scraping and sanding away old paint prevents these imperfections from carrying over to the new coat.
- **Ensuring a Smooth Transition:** Removing loose or damaged paint ensures a smooth transition between the old and new layers, preventing visible lines or uneven surfaces.
8. **Consideration for Weather Conditions:**
- **Ideal Painting Conditions:** Prep work includes planning the painting project during optimal weather conditions. Avoid extreme temperatures, high humidity, or rainy weather that can affect the paint's drying and curing process.
Conclusion:
Preparation is the unsung hero of any successful exterior painting project. By investing time and effort into thorough surface inspection, cleaning, sanding, priming, and protecting non-paint areas, you lay the groundwork for a flawless and enduring finish. Remember, the importance of prep work cannot be overstated – it's the secret ingredient that transforms a good paint job into a great one. Happy painting!

Mastering the Brush: Professional Exterior Painting Tips for a Flawless Finish
Introduction:
Achieving a professional finish on your home's exterior requires more than just a steady hand. In this blog post, we'll dive into expert tips that will elevate your exterior painting project, ensuring a flawless and long-lasting result that stands the test of time.
1. **Thorough Surface Preparation:**

- Start with a clean canvas: Clean the exterior surfaces thoroughly, removing dirt, dust, and any loose or peeling paint.
- Repair before you paint: Address any cracks, holes, or damaged surfaces. Properly prep and patch areas to ensure a smooth and even foundation.
2. **Invest in Quality Materials:**
- Choose premium paint: Invest in high-quality exterior paint that is durable and designed to withstand the elements. Quality paint provides better coverage and longevity.
- Select the right tools: Quality brushes, rollers, and other painting tools contribute to a smoother application. Don't compromise on tools; they make a significant difference in the final result.
3. **Consider the Weather:**
- Ideal painting conditions: Plan your painting project during mild weather conditions with moderate temperatures. Avoid painting in extreme heat, direct sunlight, or rainy weather.
- Follow product guidelines: Different paints may have specific temperature and humidity requirements. Follow the manufacturer's guidelines for optimal results.
4. **Test Colors Before Committing:**

- Sample different areas: Test paint samples on different areas of your home to see how they look in various lighting conditions. This helps you choose the right color with confidence.
- Observe at different times: Colors can vary throughout the day. Observe your samples in the morning, afternoon, and evening to ensure they meet your expectations.
5. **Use Proper Techniques:**
- Brush, roll, or spray: Choose the application method that suits your project. Brushing is ideal for detailed work, while rolling or spraying may provide faster coverage for larger surfaces.
- Follow a consistent direction: Maintain a consistent direction when applying paint to avoid uneven texture or streaks.
6. **Start from the Top:**
- Logical sequence: Start painting from the top down, working your way from the roof to the foundation. This prevents streaks and allows you to catch drips as you work.
- Mindful of overlaps: Pay attention to areas where wet and dry edges meet to ensure a seamless finish.
7. **Protect Surrounding Areas:**

- Mask and cover: Use painter's tape to protect areas you don't want to paint, such as windows, trim, or fixtures. Cover plants and landscaping to prevent accidental splatters.
- Use drop cloths: Place drop cloths on the ground to catch any paint drips and protect surfaces.
8. **Take Breaks and Pace Yourself:**
- Avoid fatigue: Exterior painting is a labor-intensive task. Take breaks to avoid fatigue, ensuring that you maintain focus and precision throughout the project.
- Plan multiple sessions: Break the project into manageable sessions to avoid rushing and ensure a thorough and careful application.
Conclusion:
Achieving a professional finish on your home's exterior requires a combination of meticulous preparation, quality materials, and proper techniques. By following these expert tips, you'll not only enhance your home's appearance but also ensure a durable and flawless finish that stands out for all the right reasons. Happy painting!

Crafting Harmony: A Guide to a Cohesive Exterior Color Scheme
The exterior of your home is a canvas waiting to showcase your personal style and create a lasting impression. Achieving a cohesive color scheme for your home's exterior involves thoughtful planning and consideration. In this blog post, we'll delve into the art of crafting a harmonious exterior color palette that enhances your home's curb appeal.
Understanding Color Theory:
1. **Primary Colors:** Start with the basics. Consider primary colors – red, blue, and yellow – as a foundation for your exterior color scheme.

2. **Complementary Colors:** Explore the color wheel to find complementary colors that create balance and contrast. For example, pairing warm tones with cool tones can be visually appealing.
Consider the Architecture:
1. **Architectural Style:** Different architectural styles lend themselves to specific color palettes. Research the style of your home and draw inspiration from historically accurate color schemes.
2. **Highlighting Features:** Use color strategically to highlight architectural features, such as trim, shutters, or unique design elements.
Creating Depth and Dimension:
1. **Main Color:** Choose a dominant color for the main body of your home. Consider neutral tones for a timeless and elegant look, or bolder colors for a more vibrant statement.
2. **Accent Colors:** Introduce accent colors for doors, shutters, and other architectural elements. These accents add interest and depth to the overall appearance.

Harmony Across Materials:
1. **Consider Material Finishes:** Different exterior materials (siding, brick, stucco) may absorb or reflect colors differently. Test samples on each material to ensure a cohesive look.
2. **Consistency in Finish:** Maintain a consistent finish (e.g., matte, satin, or gloss) across all surfaces to create a unified appearance.
Test Before Committing:
1. **Sample Colors:** Before finalizing your color scheme, test small samples in different areas of your home to see how they appear in various lighting conditions.
2. **Observe Throughout the Day:** Colors can look different in morning sunlight, afternoon shade, and evening light. Observe your samples at different times to ensure they work harmoniously.
Balancing Neutrals and Accents:
1. **Neutral Foundations:** Build your color scheme on a neutral base, such as white, gray, or beige. This provides flexibility for adding colorful accents.
2. **Pops of Color:** Introduce pops of color strategically to create focal points and draw attention to specific areas without overwhelming the overall palette.
Conclusion:
Crafting a cohesive exterior color scheme is a rewarding process that transforms your home into a work of art. By considering color theory, architectural style, and material finishes, you can create a harmonious palette that not only enhances curb appeal but also reflects your unique taste and style. Embrace the creative journey of bringing your exterior vision to life!

Brushing with Safety: Essential Precautions and Best Practices for Painting
Embarking on a painting project is an exciting endeavor that can transform your living space. However, ensuring your safety during the process is paramount. From handling tools to dealing with chemicals, understanding and implementing safety precautions is key to a successful and injury-free painting experience. In this guide, we'll explore essential safety measures and best practices to keep in mind when picking up that paintbrush.
**1. Ventilation Matters:**

- Adequate ventilation is crucial when painting indoors. Open windows and doors to promote air circulation, especially when using paint with strong odors or working with solvents. Consider using fans to further enhance ventilation.
**2. Wear Protective Gear:**
- Protect yourself by wearing appropriate gear. This includes safety goggles to shield your eyes from splatters, a mask to prevent inhalation of fumes, and gloves to shield your hands from chemicals. Long sleeves and pants offer additional skin protection.
**3. Check for Lead-Based Paint:**

- If your home was built before 1978, there's a risk of lead-based paint. Before starting any paint project, test for lead-based paint and take appropriate precautions if it's present. Sanding or scraping lead-based paint can release harmful dust.
**4. Read Product Labels:**
- Familiarize yourself with the labels and instructions on paint cans and other products. This information provides essential details about proper usage, safety precautions, and cleanup procedures.
**5. Prepare the Work Area:**
- Clear the work area of obstacles and ensure a clutter-free environment. This reduces the risk of accidents and allows for easy movement while painting. Cover furniture and floors with drop cloths to protect them from paint splatters.
**6. Use Stable Ladders and Scaffolding:**

- When working at height, use stable and properly positioned ladders or scaffolding. Ensure that they are in good condition and set on level ground. Never stand on the top rungs of a ladder or exceed its weight capacity.
**7. Keep Emergency Supplies On Hand:**
- Have emergency supplies readily available. This may include a first aid kit, a fire extinguisher, and a phone for quick access to emergency services. Be prepared for unexpected situations, even if they seem unlikely.
**8. Use Non-Slip Footwear:**
- Wear non-slip footwear to prevent accidents, especially when working on ladders or in areas with potential spills. A good grip on your shoes contributes to stability and reduces the risk of slipping.
**9. Be Mindful of Electrical Hazards:**
- Exercise caution around electrical outlets and wiring. Cover outlets with tape to prevent paint from entering, and avoid painting near live electrical components. If possible, turn off power to the area you're painting.
**10. Store and Dispose of Materials Properly:**

- Store paints, solvents, and other chemicals in a cool, dry place, away from heat sources. Follow local regulations for proper disposal of paint cans and other materials. Avoid pouring excess paint down drains or into the soil.
**11. Stay Hydrated and Take Breaks:**
- Painting can be physically demanding. Stay hydrated by drinking water regularly, and take breaks to prevent fatigue. Listen to your body, and don't overexert yourself.
**12. Plan for Cleanup Safely:**
- After completing your painting project, clean your tools and dispose of waste safely. Use environmentally friendly cleaning solutions, and follow guidelines for the disposal of paint cans and brushes.
**13. Seek Professional Help When Needed:**
- If you're unsure about handling certain aspects of a painting project, seek professional help. Hiring a professional painter ensures not only a quality finish but also adherence to safety standards.
By prioritizing safety and following these precautions and best practices, you can enjoy a successful painting project without compromising your well-being. Whether you're a seasoned DIY enthusiast or a novice painter, remember that safety should always be at the forefront of your creative endeavors. Happy and safe painting!

Steer Clear of Pitfalls: Common Mistakes to Avoid When Painting Your Home's Exterior
Introduction:
Embarking on an exterior painting project can breathe new life into your home, but navigating potential pitfalls is crucial for a successful outcome. In this blog post, we'll explore common mistakes that homeowners often make when painting their exteriors and provide insights on how to avoid them.
1. **Skipping the Prep Work:**
- **Mistake:** Neglecting proper surface preparation, including cleaning, sanding, and addressing repairs.
- **Solution:** Invest time in thorough prep work to ensure a smooth and durable finish. Repair any damage, clean surfaces, and consider using a primer for better adhesion.
2. **Ignoring Weather Conditions:**

- **Mistake:** Painting in extreme weather conditions, such as high humidity, rain, or direct sunlight.
- **Solution:** Choose mild weather for your painting project. Extreme conditions can affect the drying time, adhesion, and overall quality of the paint job.
3. **Choosing the Wrong Paint:**
- **Mistake:** Selecting paint based solely on color preference without considering the specific needs of your exterior surfaces.
- **Solution:** Choose a high-quality exterior paint suitable for the material of your home. Consider factors like durability, weather resistance, and maintenance requirements.
4. **Rushing the Process:**
- **Mistake:** Trying to complete the entire project in one day or rushing through each step.
- **Solution:** Plan your painting project over multiple days, allowing proper drying time between coats. Patience and attention to detail are key to achieving a professional finish.
5. **Neglecting Primer:**
- **Mistake:** Skipping the use of a primer, especially on bare wood or surfaces with stains.
- **Solution:** Apply a suitable primer before painting to improve adhesion, enhance durability, and create a more even finish.
6. **Overlooking Trim and Details:**
- **Mistake:** Focusing solely on the main body and neglecting trim, doors, and other details.
- **Solution:** Pay attention to the finishing touches. Properly paint trim, doors, and other architectural features to achieve a cohesive and polished look.
7. **Using the Wrong Tools:**
- **Mistake:** Using low-quality brushes, rollers, or sprayers.
- **Solution:** Invest in high-quality painting tools for better coverage and a smoother finish. The right tools contribute significantly to the overall result.
8. **Ignoring Safety Measures:**

- **Mistake:** Neglecting safety precautions, such as using ladders improperly or not wearing protective gear.
- **Solution:** Prioritize safety. Use appropriate safety equipment, follow ladder safety guidelines, and take necessary precautions to prevent accidents.
9. **Not Testing Colors:**
- **Mistake:** Choosing a paint color without testing samples in different lighting conditions.
- **Solution:** Test paint samples on your home's exterior to ensure the chosen color looks appealing in various lighting scenarios.
10. **Forgetting Long-Term Maintenance:**
- **Mistake:** Focusing solely on the immediate aesthetic improvements without considering long-term maintenance.
- **Solution:** Choose durable paint, follow proper maintenance practices, and be mindful of the long-term impact on your home's exterior.

Conclusion:
Avoiding these common mistakes is crucial for a successful exterior painting project. By prioritizing preparation, choosing the right materials, and embracing a patient and careful approach, you can ensure a professional finish that enhances your home's curb appeal and stands the test of time. Happy painting!

Enhance Your Home's Curb Appeal with a Fresh Coat of Paint
Your home's exterior is the first impression visitors and passersby have of your property. One of the most effective ways to boost curb appeal is by giving your house a fresh coat of paint. In this blog post, we'll explore the benefits of painting your home's exterior, share tips on choosing the right colors, and guide you through the process for a stunning transformation.
Benefits of Exterior Painting:
1. **Increased Property Value:** A well-maintained exterior can significantly enhance your home's value, making it more attractive to potential buyers.

2. **Protection Against the Elements:** Paint acts as a protective barrier, shielding your home from the damaging effects of weather, such as rain, sunlight, and temperature fluctuations.
3. **Extended Lifespan:** Regular painting helps prevent deterioration of your siding or trim, contributing to the longevity of your home's exterior materials.
Choosing the Right Colors:
1. **Consider Your Neighborhood:** While you want your home to stand out, it's essential to choose colors that harmonize with the surrounding houses.
2. **Highlight Architectural Features:** Use paint strategically to accentuate architectural details, such as trim, shutters, or unique features.
3. **Test Samples:** Before committing to a color, test small samples on different areas of your house to see how they look in various lighting conditions.

Preparation and Execution:
1. **Cleaning and Repairs:** Thoroughly clean the exterior surfaces and address any repairs or damage before starting the painting process.
2. **Quality Materials:** Invest in high-quality paint and materials to ensure a longer-lasting finish.
3. **Proper Techniques:** Whether you choose to brush, roll, or spray, using the right techniques is crucial for a professional-looking result.
Tips for a Successful Project:
1. **Plan Ahead:** Check the weather forecast and plan your painting project during a period of dry and mild weather.
2. **Safety First:** Use proper safety equipment, including ladders, goggles, and gloves, to ensure a safe painting experience.
3. **Finishing Touches:** Pay attention to details such as trim and door painting, as these finishing touches can greatly enhance the overall look.
Conclusion:
Transforming your home's exterior with a fresh coat of paint is a rewarding project that not only adds curb appeal but also protects your investment. With careful planning, attention to detail, and the right color choices, you can achieve a stunning result that leaves a lasting impression on anyone who passes by. Get ready to fall in love with your home all over again!

Brushing and Rolling: A Comprehensive Guide to Choosing the Right Tools for Your Paint Job
Selecting the appropriate paint brushes and rollers is a crucial step in achieving a professional-looking finish for your painting project. With a multitude of options available, it's essential to understand the characteristics of different brushes and rollers to make informed choices. In this guide, we'll explore the key factors to consider when choosing the right paint brush and rollers for your specific needs.
**Paint Brushes:**
*1. Bristle Type:*
- Natural Bristle Brushes: Best suited for oil-based paints and varnishes. They offer smooth application and are ideal for fine finishes.
- Synthetic Bristle Brushes: Suitable for water-based paints, acrylics, and latex. They maintain their shape well, are durable, and provide excellent coverage.
*2. Brush Shape:*

- Flat Brushes: Ideal for large, flat surfaces and straight edges.
- Angled Brushes: Perfect for cutting in along edges and corners. They offer precision and control.
- Round Brushes: Suited for detailed work, intricate patterns, and fine lines.
*3. Brush Size:*
- Choose the brush size based on the surface you are painting. Larger brushes cover more significant areas, while smaller brushes are suitable for detailed work.
*4. Handle Type:*
- Comfortable handles with a firm grip reduce hand fatigue during extended painting sessions. Choose a handle that feels ergonomic in your hand.
*5. Quality:*
- Invest in high-quality brushes for better results. Quality brushes hold more paint, provide smoother application, and last longer.
**Paint Rollers:**
*1. Roller Cover Material:*

- Nap Length: The thickness of the roller cover's fibers, also known as the nap length, varies. Choose the nap length based on the surface you are painting.
- Short Nap (1/4 inch): Ideal for smooth surfaces like metal doors or cabinets.
- Medium Nap (3/8 to 1/2 inch): Suitable for semi-smooth surfaces like walls.
- Long Nap (3/4 inch and above): Best for textured surfaces like stucco or textured ceilings.
- Roller Cover Material:
- Polyester: Works well with all paint types and is durable.
- Microfiber: Provides a smooth finish and is excellent for gloss paints.
- Foam: Suitable for smooth surfaces and leaves a smooth finish, but may not hold as much paint.
*2. Roller Frame:*
- Choose a roller frame that matches the size of your roller cover. Frames with adjustable or extendable handles offer flexibility.
*3. Roller Type:*
- Standard Roller: Ideal for general painting on walls and ceilings.
- Mini Roller: Perfect for small or tight spaces and touch-ups.
- Texture Roller: Features a patterned surface for creating textured finishes on walls.
*4. Quality:*
- Invest in high-quality roller covers and frames to ensure smooth and consistent application. Quality rollers hold more paint, reduce splatter, and last longer.
*5. Consider Roller Accessories:*

- Extension Poles: Make painting high or hard-to-reach areas easier.
- Roller Grids: Used for evenly distributing paint on roller covers.
Choosing the right paint brushes and rollers is a crucial step in achieving a successful painting project. Consider the surface, type of paint, and the finish you desire when making your selections. Investing in high-quality tools ensures a smoother application and a professional-looking result. Armed with the right brushes and rollers, you're ready to turn your painting vision into reality. Happy painting!

Shutter Elegance: A Step-by-Step Guide to Painting Your Exterior Shutters
Exterior shutters are not just functional elements; they're an opportunity to enhance the visual appeal of your home. Painting your exterior shutters is a simple yet effective way to breathe new life into your facade. In this blog post, we'll walk you through the process of painting exterior shutters, ensuring a fresh and stylish look that complements your home's aesthetic.
1. **Assess the Condition of the Shutters:**

Before diving into painting, assess the condition of your shutters. Look for any signs of damage, peeling paint, or wear. If repairs are needed, address them first to ensure a smooth and durable finish.
2. **Choose the Right Paint:**
Select a high-quality exterior paint designed for the material of your shutters (wood, vinyl, metal, etc.). Consider weather resistance, UV protection, and the desired finish (matte, satin, or gloss). Satin finishes are often a popular choice for shutters as they strike a balance between durability and aesthetics.
3. **Select Your Color:**

Choose a color that complements the overall color scheme of your home. You can opt for a classic match with your home's trim or explore a contrasting color for a bold statement. Consider testing small paint samples to visualize how the color will look against your exterior.
4. **Prepare the Shutters:**
Clean the shutters thoroughly to remove dust, dirt, and any loose paint. Use a mild detergent or a mixture of water and vinegar. For vinyl shutters, avoid using abrasive cleaners that may damage the surface.
5. **Sand and Prime (if necessary):**
If your shutters have glossy surfaces or if you're transitioning from a dark to a light color, consider sanding them lightly to create a better surface for paint adhesion. Apply a primer if needed, especially for bare wood or if there are stains that may bleed through the paint.
6. **Protect Surrounding Areas:**
Cover adjacent surfaces, windows, and any surrounding areas with drop cloths or painter's tape to prevent accidental paint splatter. Taking this precaution makes cleanup easier and ensures a professional finish.
7. **Use the Right Tools:**
Invest in quality brushes or a paint sprayer for a smooth and even application. Brushes are excellent for detail work, while sprayers can be efficient for larger areas. Choose the tool that suits the material and design of your shutters.
8. **Apply Thin Coats:**
Instead of applying a thick coat of paint, go for multiple thin layers. This approach allows for better adhesion, faster drying times, and a more professional finish. Make sure each coat is dry before applying the next.
9. **Allow for Proper Drying Time:**
Patience is key. Allow the shutters to dry completely between coats and after the final application. Rushing the process may lead to smudges, uneven coverage, or damage to the fresh paint.
10. **Reinstall with Care:**
Once the paint has dried, reinstall the shutters with care. Ensure all hardware is securely fastened, and take the opportunity to make any adjustments or replacements if necessary.
11. **Regular Maintenance:**
Extend the life of your freshly painted shutters by implementing regular maintenance. Wipe them down periodically to remove dust or dirt, and touch up any areas that may experience wear over time.
By following these steps, you can transform the exterior of your home with beautifully painted shutters. Whether you're going for a classic look or introducing a pop of color, painting your shutters is a rewarding project that enhances your home's curb appeal. Enjoy the renewed elegance and charm your freshly painted shutters bring to your facade!

Deck Revival: A Comprehensive Guide to Painting Your Outdoor Oasis
Your deck, often the stage for outdoor gatherings, barbecues, and moments of relaxation, deserves a makeover. Painting your deck is a transformative process that not only enhances its aesthetic appeal but also adds a layer of protection against the elements. In this blog post, we'll take you through the steps to achieve a stunning deck revival through the art of painting.
1. **Evaluate the Condition:**

Begin by assessing the current condition of your deck. Look for signs of wear, splinters, or discoloration. Address any structural issues before diving into the painting process to ensure a solid foundation.
2. **Clean Thoroughly:**
Clean the deck surface thoroughly to remove dirt, mildew, and any remnants of old finishes. A power washer or deck cleaner can be effective in preparing the surface for painting. Allow the deck to dry completely before moving on to the next step.
3. **Choose the Right Paint:**
Select a high-quality deck paint that is designed for outdoor use. Consider factors such as weather resistance, UV protection, and durability. Acrylic-based paints are a popular choice for decks due to their flexibility and long-lasting finish.
4. **Select Your Color Palette:**

Choose a color palette that complements your home's exterior and blends well with the natural surroundings. Neutral tones provide a classic look, while bold colors can add a touch of personality. Consider your outdoor furniture and decor when making color choices.
5. **Test the Paint:**
Before committing to the entire deck, test the chosen paint on a small, inconspicuous area. This allows you to confirm the color and ensure it aligns with your vision for the space.
6. **Prepare the Area:**
Protect surrounding areas by covering plants, nearby structures, and any furniture that you don't want to be painted. Use painter's tape to secure edges and create clean lines.
7. **Apply Primer (If Necessary):**
Some deck paints come with built-in primers, while others may require a separate application. Follow the product instructions and apply a primer if recommended for optimal adhesion.
8. **Use the Right Tools:**

Quality brushes, rollers, or sprayers are essential for achieving a professional finish. Consider the type of deck surface and choose the appropriate tools accordingly.
9. **Apply Thin Coats:**
Instead of applying a thick coat of paint, opt for multiple thin layers. This ensures even coverage and helps prevent issues like drips or uneven color distribution. Allow each coat to dry thoroughly before applying the next.
10. **Seal and Protect:**
Consider applying a clear sealant over the painted deck surface to provide an extra layer of protection. This helps guard against moisture, UV rays, and general wear and tear, extending the life of your deck's fresh new look.
11. **Enjoy Your Revitalized Deck:**
Once the paint has dried and the protective sealant is in place, take a moment to appreciate your revitalized deck. Dress it up with outdoor furniture, plants, and lighting to create an inviting space ready for outdoor enjoyment.
By following these steps, you can transform your deck into a vibrant and stylish outdoor oasis. Whether you prefer a classic look or a bold statement, painting your deck is a rewarding project that adds both beauty and functionality to your outdoor living space. Embrace the transformation and get ready to enjoy countless moments of relaxation and entertainment on your newly painted deck!

Al Fresco Elegance: A Guide to Painting Outdoor Entertainment Spaces
As the allure of outdoor living spaces continues to grow, the importance of a well-designed and inviting outdoor entertainment area cannot be overstated. If you're looking to refresh your outdoor space with a splash of color, this blog post is your guide to painting outdoor entertainment spaces. Let's explore the steps to create an al fresco oasis that seamlessly blends style and durability.
1. **Define Your Style:**

Consider the overall style you want to achieve in your outdoor entertainment space. Whether it's a vibrant and lively atmosphere or a serene and calming retreat, your color choices will set the tone for the entire space.
2. **Choose Outdoor-Friendly Paint:**
Opt for high-quality exterior paint specifically formulated for outdoor use. These paints are designed to withstand the elements, including sunlight, rain, and temperature fluctuations, ensuring longevity and vibrant color retention.
3. **Blend with Nature:**

Take cues from your outdoor surroundings. Consider the colors of existing landscaping, foliage, and natural elements. Harmonizing your color palette with nature creates a cohesive and visually appealing outdoor environment.
4. **Accentuate Key Features:**
Identify the key features of your outdoor space that you want to highlight. Whether it's a focal point like a fireplace, a pergola, or decorative furniture, choose colors that enhance and complement these elements.
5. **Experiment with Color Blocking:**
Color blocking is an excellent technique for creating visual interest. Choose two or more complementary colors and use them strategically to define different zones within your outdoor space. This adds a playful and dynamic touch to the overall design.
6. **Consider Light Reflectance:**
Outdoor spaces experience varying levels of natural light throughout the day. Test your chosen paint colors under different lighting conditions to ensure they look appealing and consistent, whether in bright sunlight or during the softer hues of dusk.
7. **Prep and Prime Surfaces:**
Prepare surfaces by cleaning and priming them before painting. This step ensures better paint adhesion and a more uniform finish. Depending on the material (wood, metal, concrete), choose an appropriate primer for optimal results.
8. **Invest in Quality Brushes and Rollers:**
Quality tools make a significant difference in achieving a professional-looking finish. Invest in good brushes and rollers suitable for outdoor painting to ensure smooth application and even coverage.
9. **Protect Surrounding Areas:**
Cover nearby plants, decks, or other surfaces with drop cloths to prevent accidental paint splatter. This precautionary step makes cleanup easier and preserves the integrity of your outdoor space.
10. **Maintenance and Touch-Ups:**
Regular maintenance is key to preserving the beauty of your outdoor entertainment space. Keep an eye out for any signs of wear and tear, and promptly touch up areas that may require attention to maintain a fresh and vibrant appearance.
By following these steps, you can transform your outdoor entertainment space into a visually stunning and welcoming haven. From lively gatherings to tranquil retreats, the right combination of colors can elevate your outdoor experience and create lasting memories in a space that reflects your unique style. Cheers to a season of al fresco elegance!